Alert suppression
Alert suppression in Kaseya MDR allows you to reduce alert noise by preventing specific events from triggering notifications, tickets, or automated response actions, without stopping data ingestion or detection.
Suppression rules are intended for known, expected, or low‑risk activity that would otherwise generate repetitive alerts under well‑defined conditions, such as a specific event type, product, location, user, or time window.
Suppression rules are managed from Events > Suppression Rules and apply after events are ingested and evaluated, not at the integration or data source level.
This article explains how alert suppression works and how suppression rules are configured and managed. It does not help you decide whether suppression is appropriate. If you are encountering the same alert repeatedly and are deciding whether suppression or tuning is the right action, start with Managing repeated alerts, which walks through investigation‑first decision‑making before rule creation.
Use this article when:
-
You are ready to configure alert suppression rules after investigating and validating the activity.
-
You need procedural guidance on creating, editing, or reviewing suppression rules.
-
You are making scoped, auditable alert‑noise decisions as part of operating Kaseya MDR.
How alert behavior decisions fit together
Use the articles in this section together as a deliberate decision ladder:
-
Start with the alert
Review the alert and understand what it represents before taking action.
-
Investigate before changing behavior
Use the Analysis page to validate context, scope, and impact.
-
Decide how (or whether) alert behavior should change
Determine whether tuning, suppression, or no action is appropriate based on investigation results.
-
Apply the selected change in the correct place
Severity or detection tuning > global prioritization changes.
See: Managing alert severity and detection tuningSuppression rules > scoped exceptions for specific conditions.
See Suppressing alerts from Events; Alert suppression
Each article in this set is intentionally scoped to one step in this process.
Avoid skipping steps. Changing alert behavior without investigation can hide meaningful security activity and reduce confidence in response decisions
Understanding alert suppression in Kaseya MDR
In Kaseya MDR, suppression operates as part of the alerting and rule evaluation pipeline:
-
Events are still collected from integrations and data sources
-
Detection and rule logic evaluates incoming events
-
Suppression rules determine whether matching events:
-
Trigger automated response actions
-
Create PSA tickets or email notifications
-
Escalate through downstream notification workflows
-
-
Suppressed events are not deleted and, unless explicitly hidden, remain visible in the Analysis page for investigation and audit purposes.
IMPORTANT Suppression does not disable integrations, stop event ingestion, or remove data from the platform.
When to use alert suppression
Use alert suppression when all of the following are true:
-
You have reviewed the activity and confirmed it is expected or acceptable
-
The alert is valid in other scenarios and should not be disabled globally
-
The behavior can be clearly identified using specific conditions
-
The goal is to reduce noise, not hide unknown or risky activity
Examples:
-
A known API key rotation event that generates repeated alerts
-
Login activity from an approved geographic location during planned work
-
Expected administrative actions during a maintenance window
If an alert is consistently low value across your entire environment, adjust alert severity or detection tuning before creating a suppression rule.
Before creating suppression rules, investigate at least one representative alert in Analysis to confirm the behavior is expected and low risk. For scenario‑driven workflows that start from a specific alert or investigation context, see Suppressing alerts from Events (investigation‑based suppression).
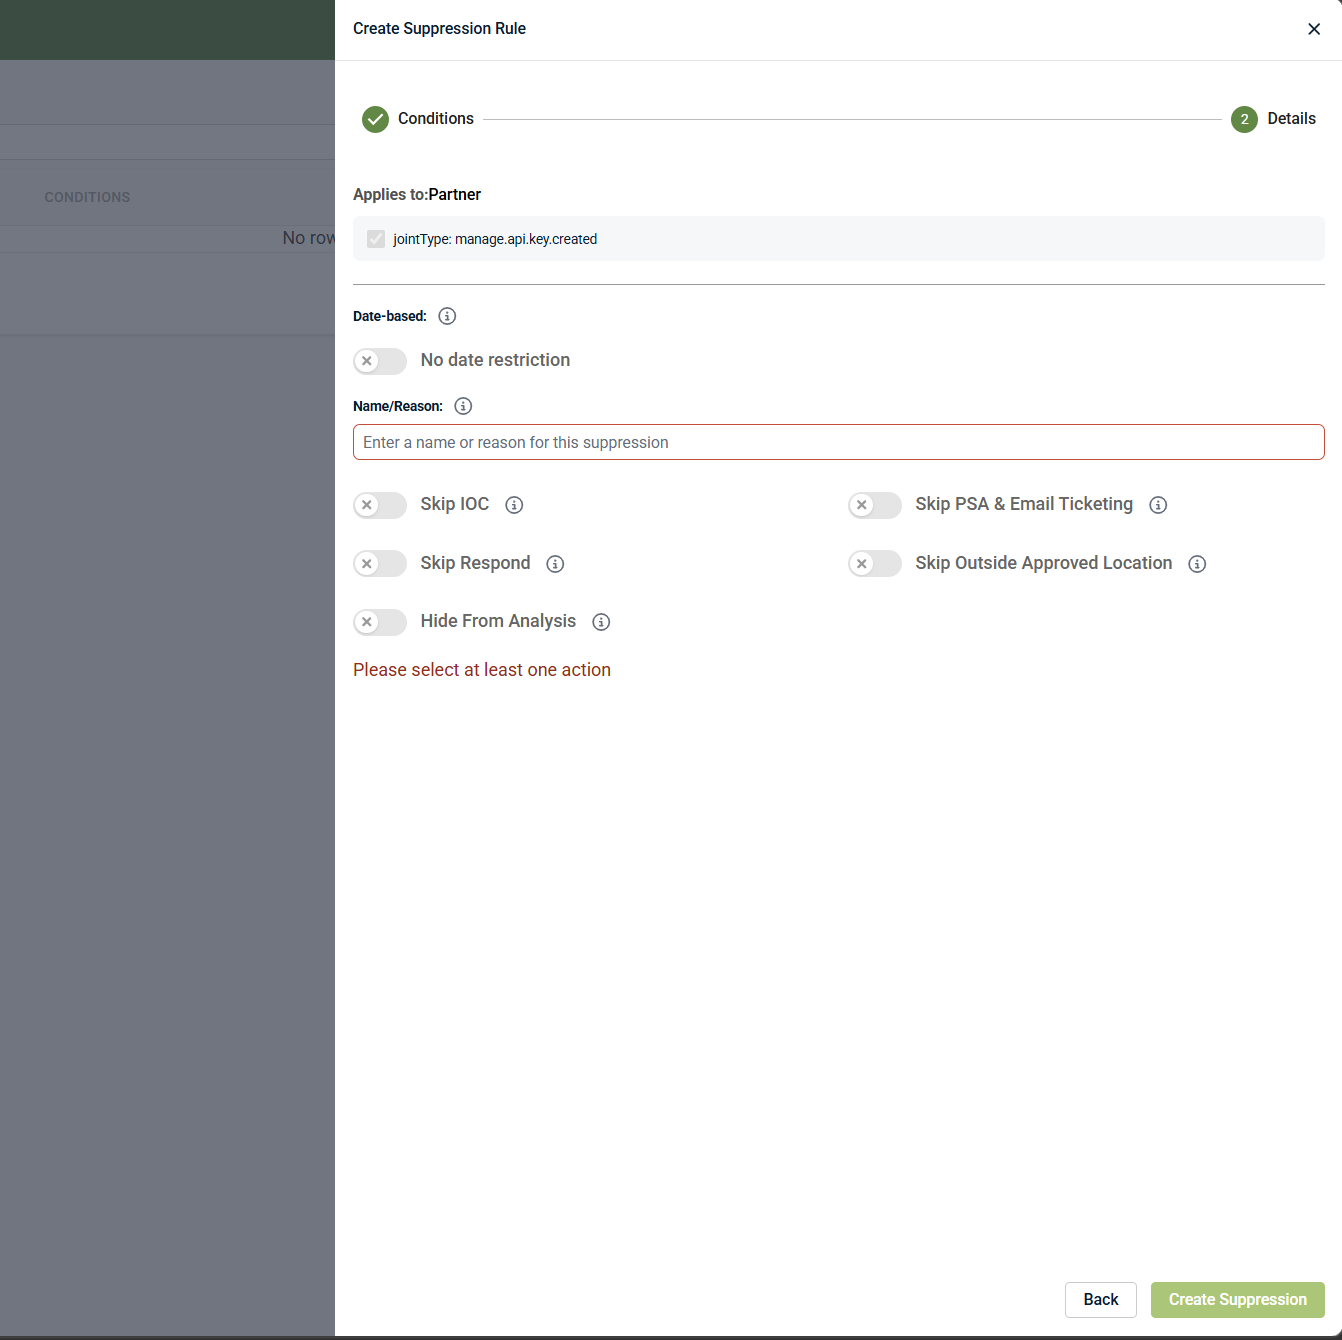
Creating a suppression rule
Creating a suppression rule is a two‑step process:
-
Define the conditions that identify the activity
-
Define what actions should be skipped when those conditions are met
Defining the conditions
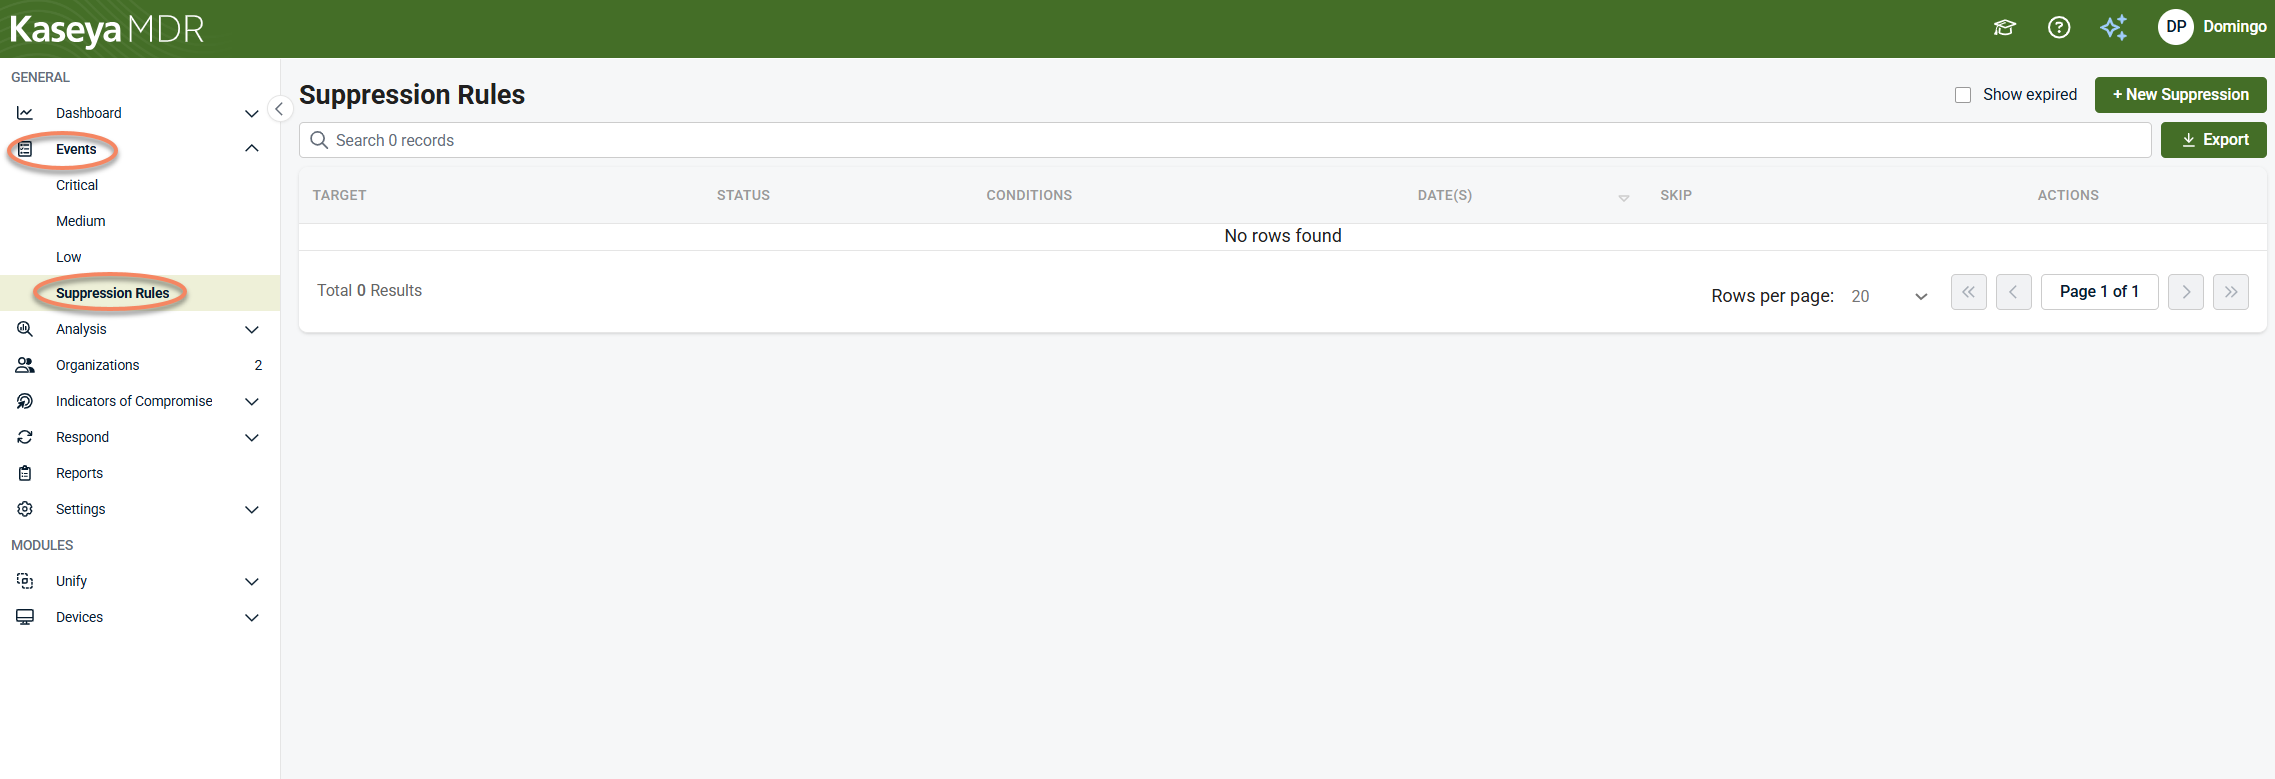
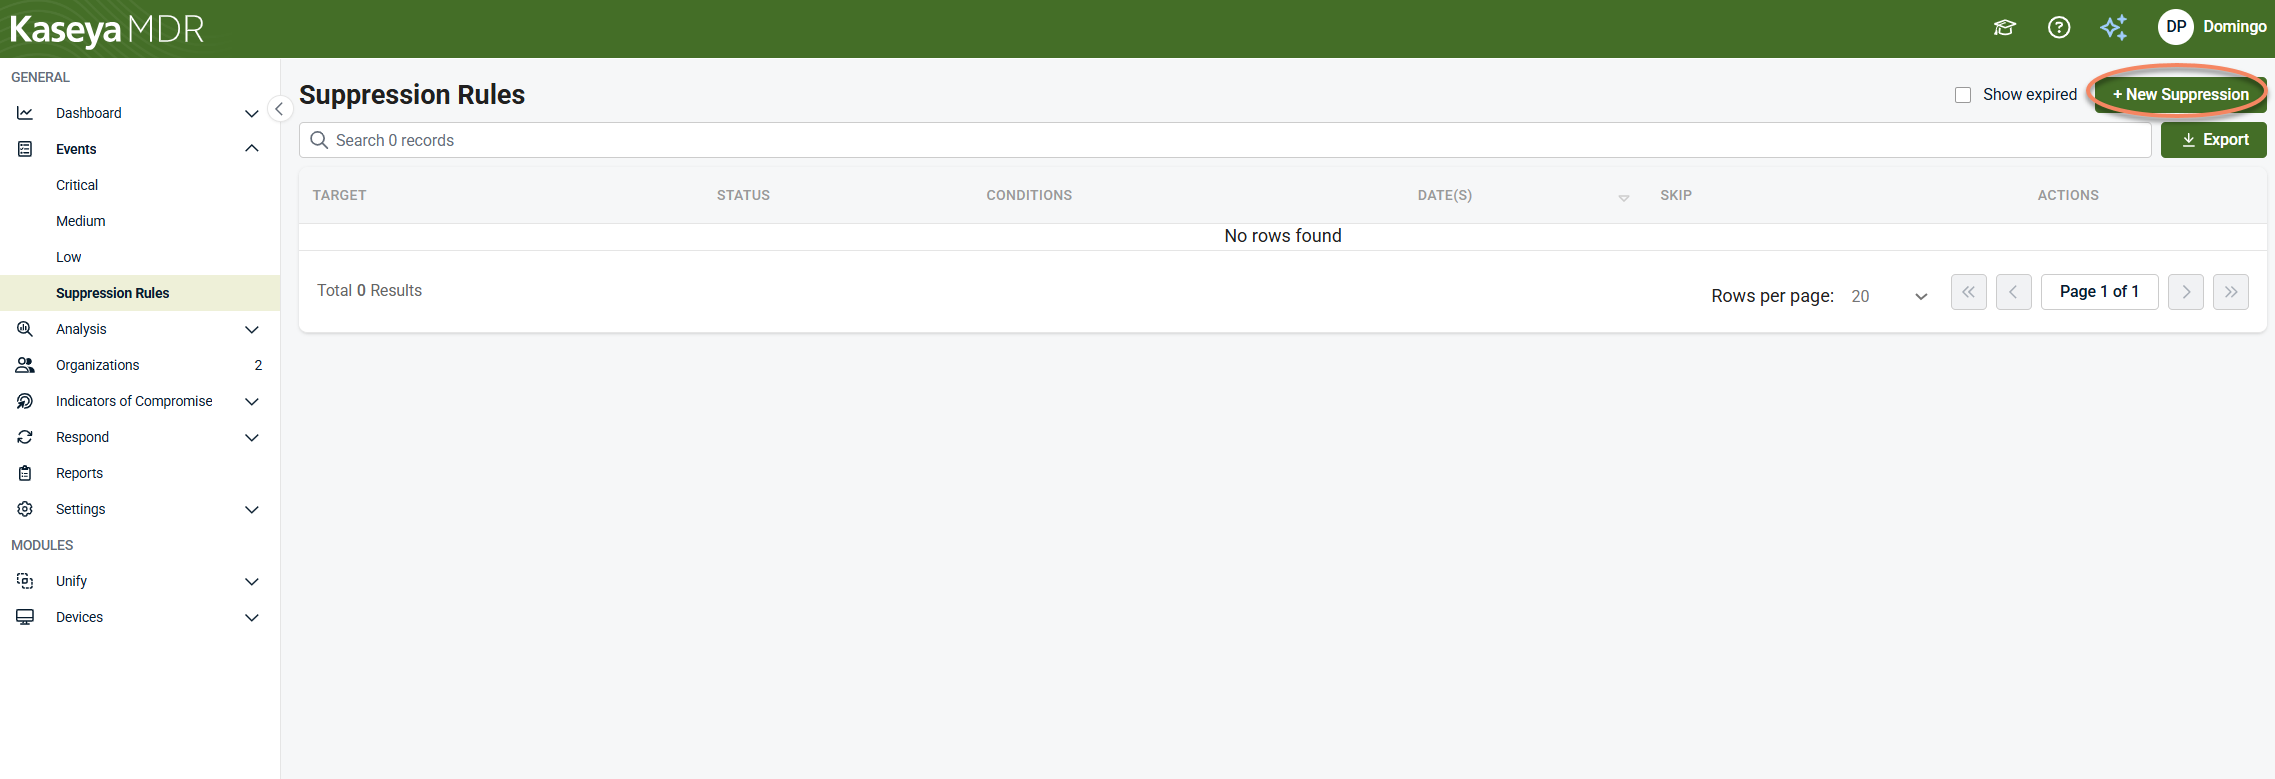
Step 1: Open Suppression Rules
-
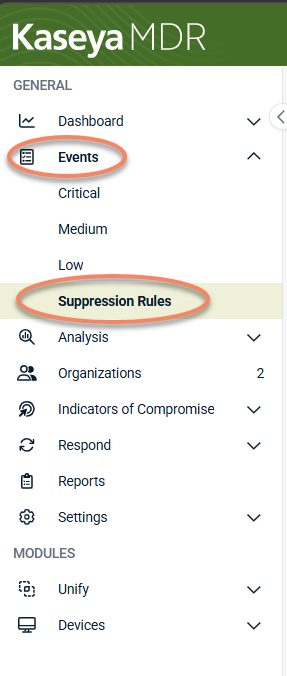
From the side navigation menu, select Events
-
Select Suppression Rules
-
Click + New Suppression
Step 2: Define suppression conditions
Suppression conditions determine which events the rule applies to.
-
Applies to: Select the scope where the suppression applies (for example, partner or tenant).
-
Product: Choose the product that generates the event (for example, Datto EDR).
-
Event type: Select the specific event type to suppress (for example, API Key Created, External Integration Created, Mailbox Permission Added).
Optional condition fields
Depending on the selected product and event type, you may also define:
-
Additional description text
-
User agent string
-
Device or identity mapping status
-
IP address
-
Country or location
-
Custom fields (up to 10)
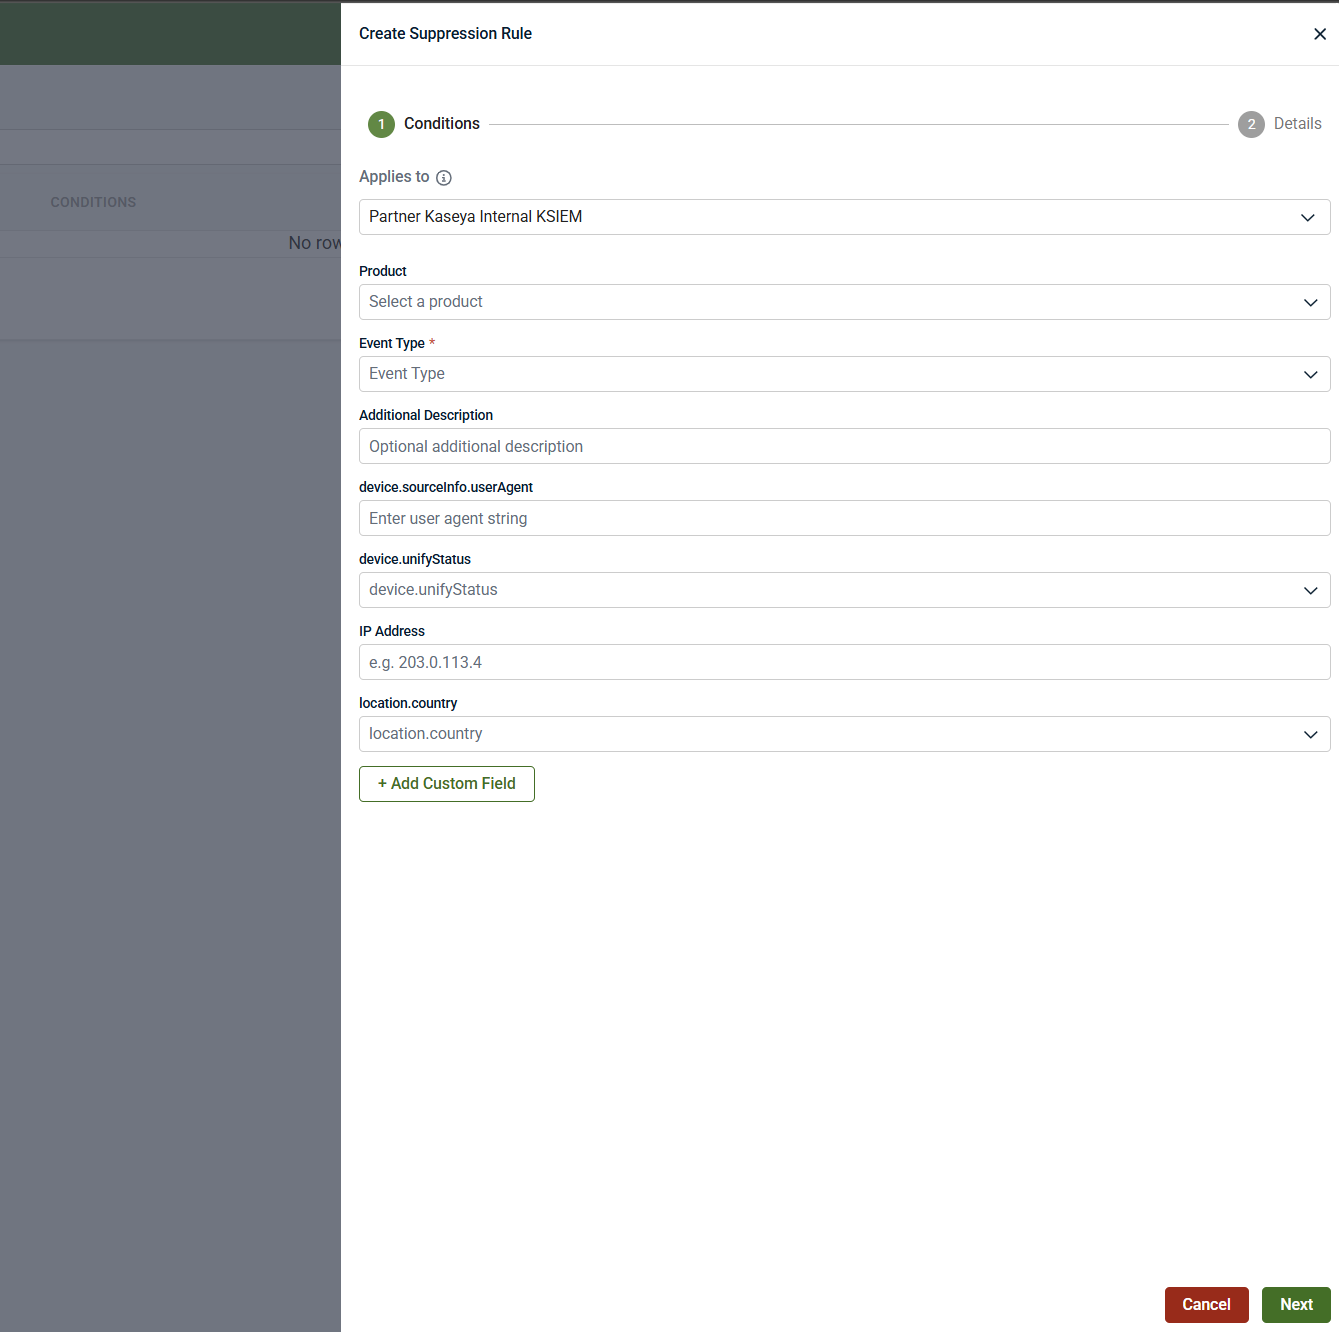
Best practice: Use the smallest possible set of conditions that uniquely identifies the expected behavior. Overly broad conditions increase the risk of hiding important alerts.
NOTE The available device.unifyStatus values reflect different unification outcomes for devices and users. Use this field only when you understand the context in which a specific status appears and have validated representative events in Analysis.
Configuring suppression behavior
After defining conditions, configure how the suppression behaves.
Date‑based suppression
-
Enable date‑based suppression to create temporary or planned exceptions
-
Specify a start and end date
-
Leave date‑based suppression disabled for indefinite rules
Temporary suppressions are strongly recommended whenever possible to reduce long‑term blind spots by ensuring exceptions expire when planned activity ends.
When date‑based suppression is disabled, the suppression remains active indefinitely until it is manually removed.
Name / reason (required)
Provide a clear explanation for why the suppression exists. Include:
-
Business or operational justification
-
Change‑management or support ticket references
-
Context for future review
This information is visible to other administrators and is important for audits and ongoing review.
Selecting suppressed actions
You can control which downstream actions are skipped when the suppression conditions are met:
-
Skip IOC: Prevents indicator‑of‑compromise escalation for matching events
-
Skip Respond: Prevents automated response actions from triggering
-
Skip PSA & email ticketing: Prevents PSA tickets or email notifications from being generated
-
Skip outside approved location: Suppresses alerts that would normally trigger based on activity outside approved geographic locations
-
Hide from Analysis: Removes suppressed events from the Analysis view
IMPORTANT If Hide from Analysis is not enabled, suppressed events remain searchable and visible for investigation and historical reference. Enable Hide from Analysis only when you fully understand the investigation and compliance impact. Otherwise, leave Analysis visibility enabled.
Saving the suppression rule
-
Review the configured conditions and actions.
-
Click Create Suppression.
-
A confirmation message appears when the rule is successfully created.
The rule becomes active immediately or at the configured start time.
Viewing and managing suppression rules
View active and future rules
Open Events > Suppression Rules. Active and scheduled rules are listed by default.
View expired rules
Enable Show expired to view rules that have reached their end date.
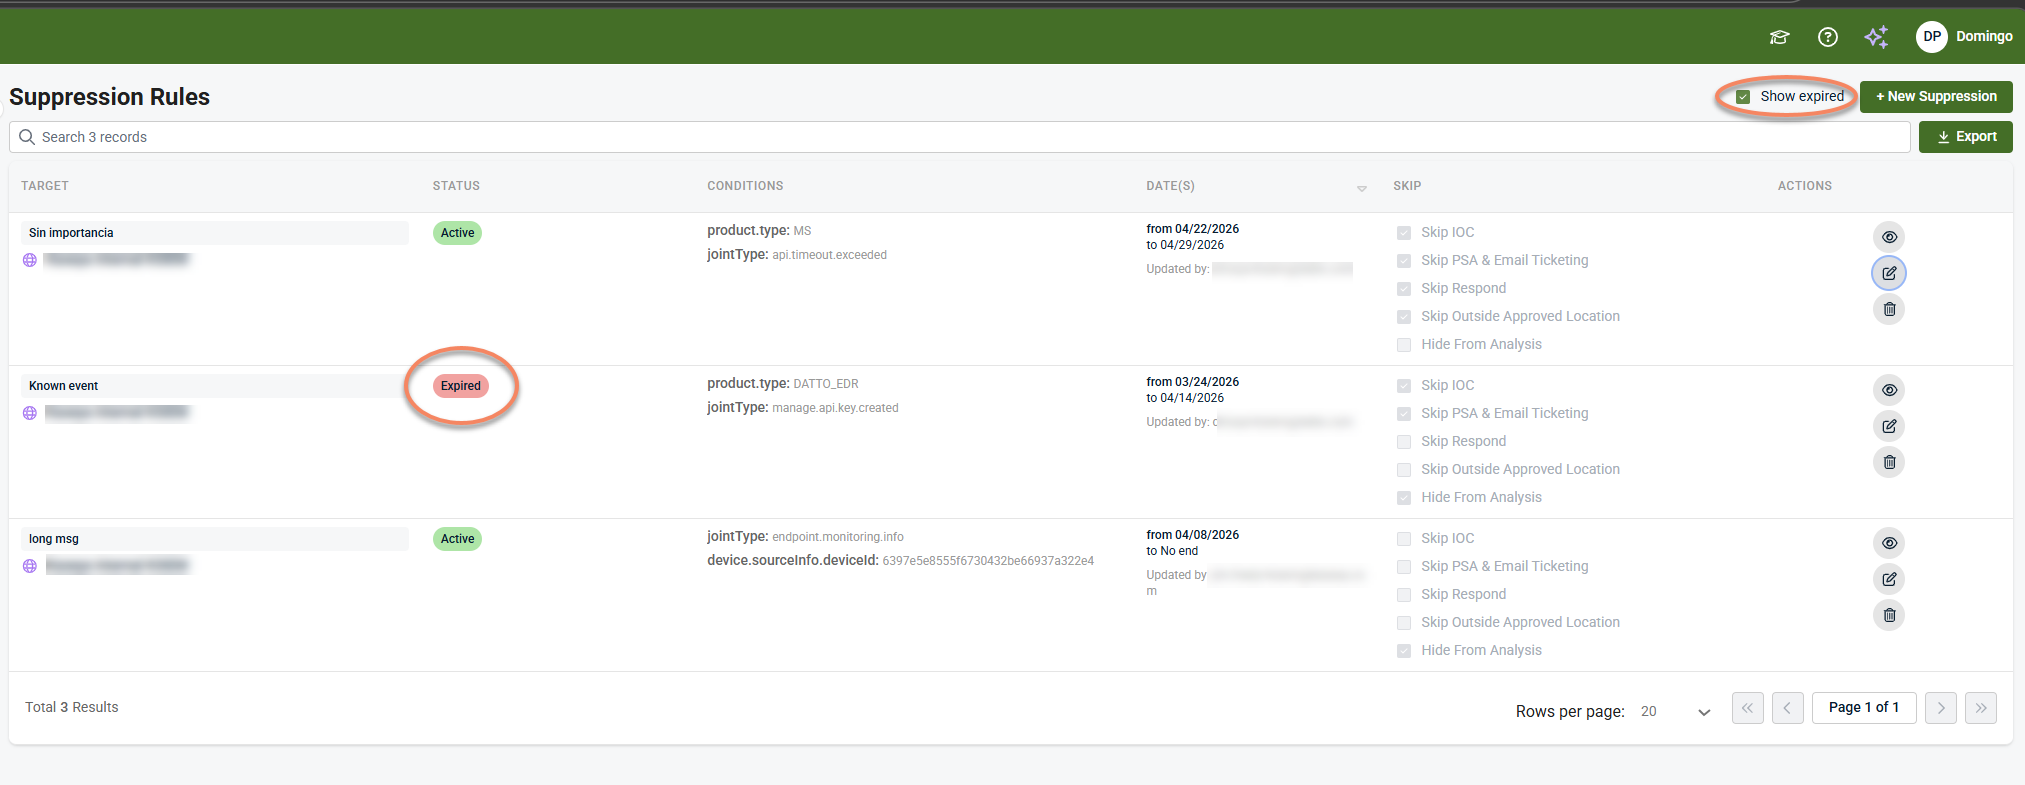
Expired rules are retained for visibility and auditing
Review suppressed events
Click the eye icon to view events affected by a suppression rule.
![]()
This opens the Analysis page filtered to show only events that matched the rule during its active period. This view shows the underlying events associated with the suppression rule.
Editing a suppression rule
You can edit an existing suppression rule on the Edit Event Suppression Rule by clicking the pencil icon.

Then, click Update Suppression to save your changes.
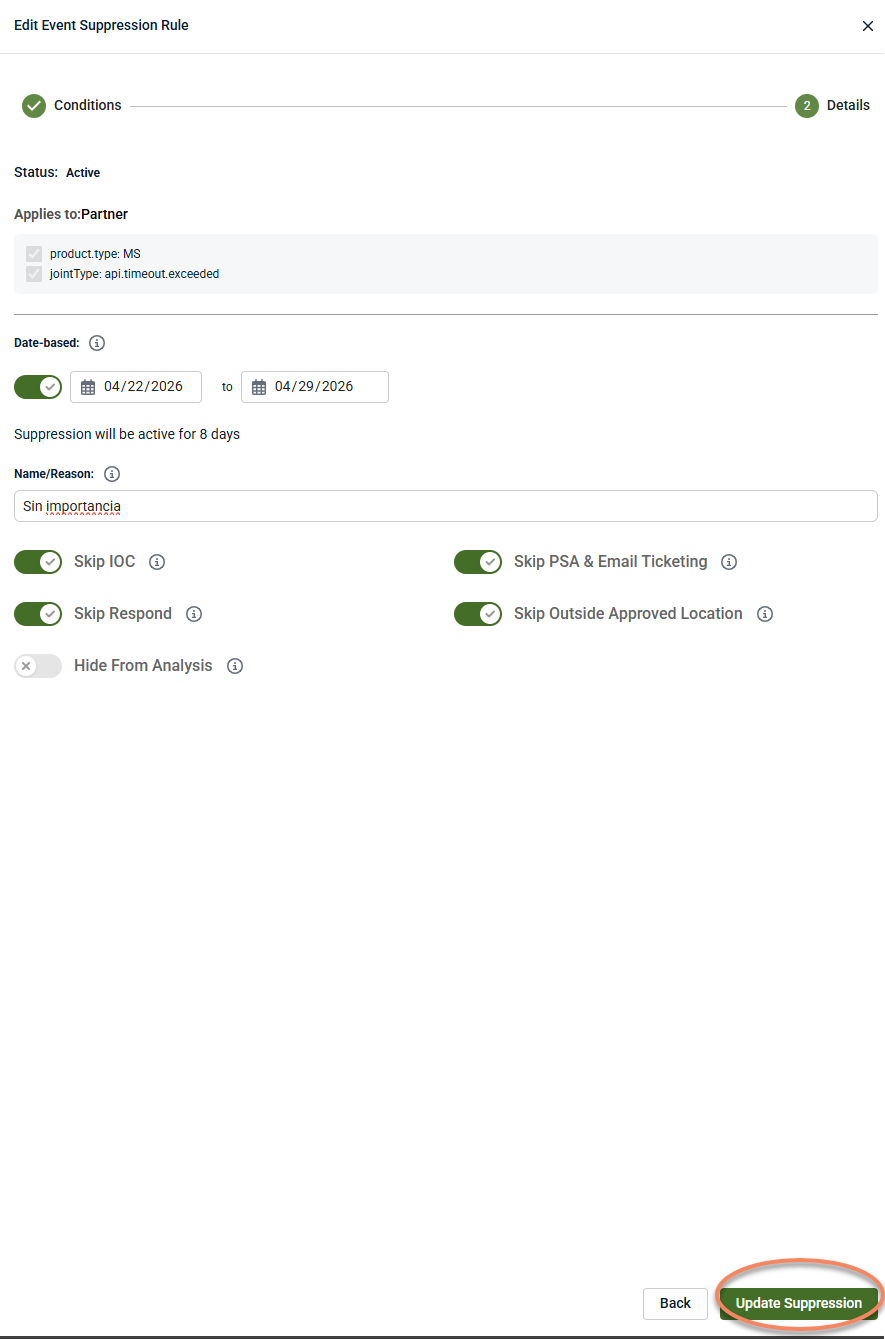
You will see a confirmation message that your rule has been successfully updated.
NOTE Although suppression rules can be fully edited, changing the scope or intent of an existing rule can make historical decisions harder to track. When the behavior being suppressed changes significantly, consider creating a new suppression rule instead of modifying an existing one.
Deleting a suppression rule
To delete a suppression rule, click the trash can icon and confirm removal.
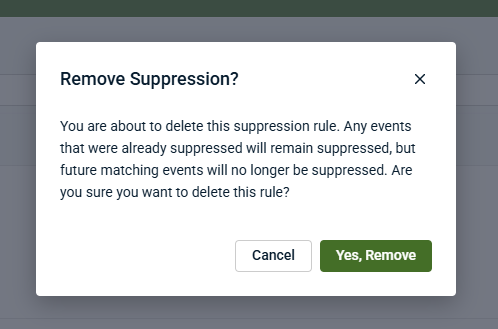
Deleted rules are permanently removed and do not appear under expired rules.
Best practices for alert suppression
Use the following best practices to reduce noise without obscuring meaningful security signals:
-
Prefer tuning before suppression: Use severity or detection tuning for globally low‑value alerts before applying suppression.
-
Scope rules narrowly: Limit suppressions to specific products, event types, users, locations, or time windows.
-
Validate before suppressing: Review representative activity in Analysis to confirm behavior is expected.
-
Use temporary suppressions whenever possible: Especially for maintenance, onboarding, or planned changes.
-
Document clearly: Always include a reason and relevant context for audits and future review. Clear documentation helps preserve decision context for audits, reviews, and future investigators who may revisit the suppression.
-
Avoid hiding events from Analysis unless necessary: Retaining visibility supports investigation and compliance.
-
Review suppressions regularly: Remove rules that are no longer required.
-
Confirm alerts still trigger outside the scope: Verify suppression does not unintentionally block unrelated alerts.
Examples of alert‑suppression scenarios in Kaseya MDR
The following examples are illustrative patterns, not exhaustive or guaranteed alert scenarios. Actual alert behavior depends on detections, integrations, and investigation context. Suppression in MDR represents an operational risk decision and should be applied only when the behavior is well understood.
Example 1: API key rotation generating repeated alerts
Scenario: Automated API key rotation triggers repeated alerts during a planned credential update.
Approach:
-
Investigate a representative alert to confirm the activity is expected and low risk.
-
Scope suppression to the specific event type and product involved.
-
Use a temporary, date‑based suppression aligned with the rotation window.
Why it works: It reduces noise from a known, time‑bound maintenance activity while preserving alerting outside the defined rotation period.
Example 2: Admin login activity from an approved geographic location
Scenario: Administrative logins from a known location occur during scheduled maintenance or support activity and consistently trigger alerts.
Approach:
-
Validate the activity through investigation to confirm it is expected in this context.
-
Scope suppression using location and time‑based conditions.
-
Ensure alerts still trigger for the same activity outside the defined context.
Why it works: It reduces alerts only for approved, limited scenarios while preserving detection for unusual locations or times.
Example 3: Planned maintenance causing temporary alert spikes
Scenario: Planned system or application maintenance generates short‑term spikes in alerts related to configuration or access changes.
Approach:
-
Investigate the alert pattern to confirm it aligns with the planned maintenance.
-
Create a time‑bound suppression that matches the maintenance window.
-
Document the maintenance context for audit and review.
Why it works: It limits expected alert noise without creating long‑term blind spots once maintenance is complete.
Example 4: Integration validation during initial onboarding
Scenario: A newly enabled integration generates elevated alerts during initial synchronization, validation, or baseline evaluation.
Approach:
-
Confirm through investigation that the activity is expected during onboarding.
-
Scope suppression to the specific integration and event types involved.
-
Use a temporary suppression and review behavior once the integration stabilizes.
Why it works: It reduces short‑term onboarding noise while ensuring alerts resume once the environment reaches steady state.
Example 5: Onboarding bursts during initial deployment
Scenario: During early onboarding, legitimate setup activity causes a brief increase in alerts before normal operational patterns are established.
Approach:
-
Investigate at least one representative alert to validate the behavior.
-
Apply temporary, narrowly scoped suppression for the onboarding period.
-
Remove or review the suppression once onboarding is complete.
Why it works: It allows operational flexibility during early setup without masking alerts in normal operation.
Related articles
-
Investigating activity using the Analysis page: Learn how to review correlated activity, timelines, and related entities to validate scope, impact, and intent during investigation
-
Suppressing alerts from Events (investigation‑based suppression): Explains how to suppress repeated alerts from Events after investigation, while preserving visibility for analysis and historical review
-
Managing noise and signal: Learn how to decide between tuning, suppression, and detection refinement as part of ongoing alert-noise operations
-
Managing alert severity and detection tuning: Learn how to adjust severity and detection logic to improve signal quality when alerts are consistently low value across your environment
-
Creating high‑confidence alerts with Respond rules: Learn how to combine multiple signals into higher‑confidence alerts and define when automated or assisted response should occur


