Creating Respond rules
The Respond module allows you to define rules that evaluate security activity and determine what should happen when specific conditions are met. Respond rules are used to surface meaningful patterns, trigger alerts, and optionally execute response actions when appropriate.
This article explains how Respond rules are structured, how they are created, and how they can be safely managed during validation and tuning.
What a Respond rule does
A Respond rule evaluates security‑relevant activity within a defined scope and applies logic to determine whether a response is required. Rules are designed to support investigation‑first workflows, allowing you to observe behavior, validate patterns, and apply automation only when confidence is high.
Respond rules can be used for:
-
Alert‑only visibility
-
Manual approval workflows
-
Automated response actions
Not every Respond rule needs to take action. Alert‑only rules are commonly used during validation or when automation is not appropriate.
Automated response actions are intended to reduce immediate risk (for example, isolating access or limiting impact) while investigation continues. They do not perform root‑cause analysis, forensic reconstruction, or long‑term remediation.
IMPORTANT Respond rules do not replace IOC rules. IOC rules define individual signals. Respond rules are used when multiple signals, such as IOC matches combined with other alerts or events, must be evaluated together to determine whether escalation or response is warranted.
Respond rules in Kaseya MDR are part of a shared rule model across Kaseya security products. If multiple products (such as SaaS Alerts or Kaseya SIEM) are in use, the same Respond rule may be visible and editable within each product surface.
Editing or disabling a Respond rule in one product updates that rule across all products where it appears. However, while rule configuration is shared, rule execution and alerting behavior occur within the context of each product and depend on available data, integrations, and configuration.
Understanding the building blocks of a Respond rule
Respond rules are built from a small set of shared components that work together to determine when a pattern is significant and what should happen when it is detected.
At a conceptual level, Respond rules follow a familiar logical structure:
IF specific activity occurs
AND certain conditions are met
WITHIN a defined time window or threshold
THEN generate an alert or take action
Each part of this logic maps to a specific rule component:
-
Triggers define what activity starts rule evaluation. Triggers determine what the system listens for.
-
Conditions refine and contextualize that activity so only relevant instances are evaluated.
-
Thresholds and time windows determine how often or how quickly activity must occur before it becomes significant.
-
Actions define what happens when all conditions are met, such as generating an alert, requiring approval, or executing a response.
These same components are used throughout detection logic in Kaseya SIEM, including IOC rules and Respond rules. In Respond rules, they are combined intentionally to surface higher‑confidence patterns, rather than isolated events.
How Respond rules are structured
A Respond rule is composed of the following logical components:
-
Trigger: Defines the activity that initiates rule evaluation. A trigger identifies what the system should listen for before applying additional rule logic.
-
Conditions: Refine the trigger by specifying which instances of activity matter. Conditions help distinguish meaningful behavior from background noise.
-
Thresholds and time windows: Determine how often or within what time period activity must occur before the rule is considered matched.
-
Response: Defines what happens when the rule conditions are met. This may include alert‑only behavior, manual approval, or automated actions.
-
Schedule: Controls when the rule is allowed to run, such as always on, during a specific time window, or on a recurring schedule.
These components work together to ensure rules are precise, intentional, and aligned with operational needs.
Before you begin
Before creating Respond rules, confirm the following:
-
Respond is turned on.
-
You have selected which organizations are enabled for Respond.
-
You have access to the Respond module and have accepted the required permissions.
-
Multi‑factor authentication (MFA) is enabled for your user account.
-
Respond connections are active for any organization where automated or manual response actions will be applied.
When Respond is enabled or when organizations are connected, authentication using a global administrator account specific to the customer domain is required.
If you’re new to Respond or want an overview of the module UI, start with Using the Respond Module.
Creating a Respond rule
When creating a Respond rule, you define:
-
The scope of activity to evaluate (applications, organizations, accounts)
-
The trigger and conditions that identify the behavior of interest
-
Any thresholds or time constraints that must be met
-
The desired response outcome
-
When the rule should be active
Respond rules can evaluate activity even when Respond is not enabled for an organization if the rule is configured as alert‑only. Automated response actions require an active Respond connection.
If you are creating your first Respond rule, start with an alert‑only response. Validate the pattern using Analysis, then add automated actions only after you confirm the rule behaves as expected. For guidance on designing Respond rules that produce high‑confidence alerts, see Creating high-confidence alerts with Respond rules.
Step 1: Start a new rule
-
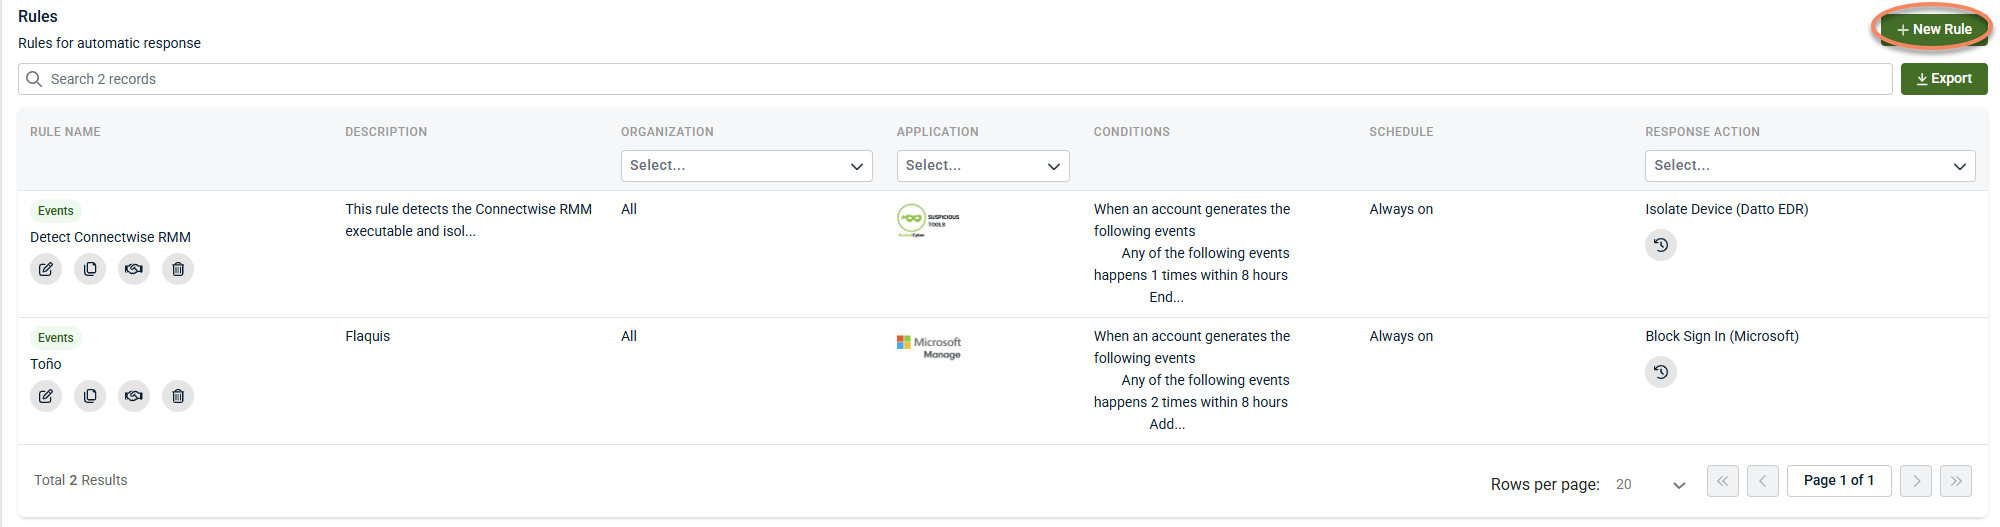
From the side navigation menu, go to Respond > Rules.
-
On the Rules tab, click + New Rule.
-
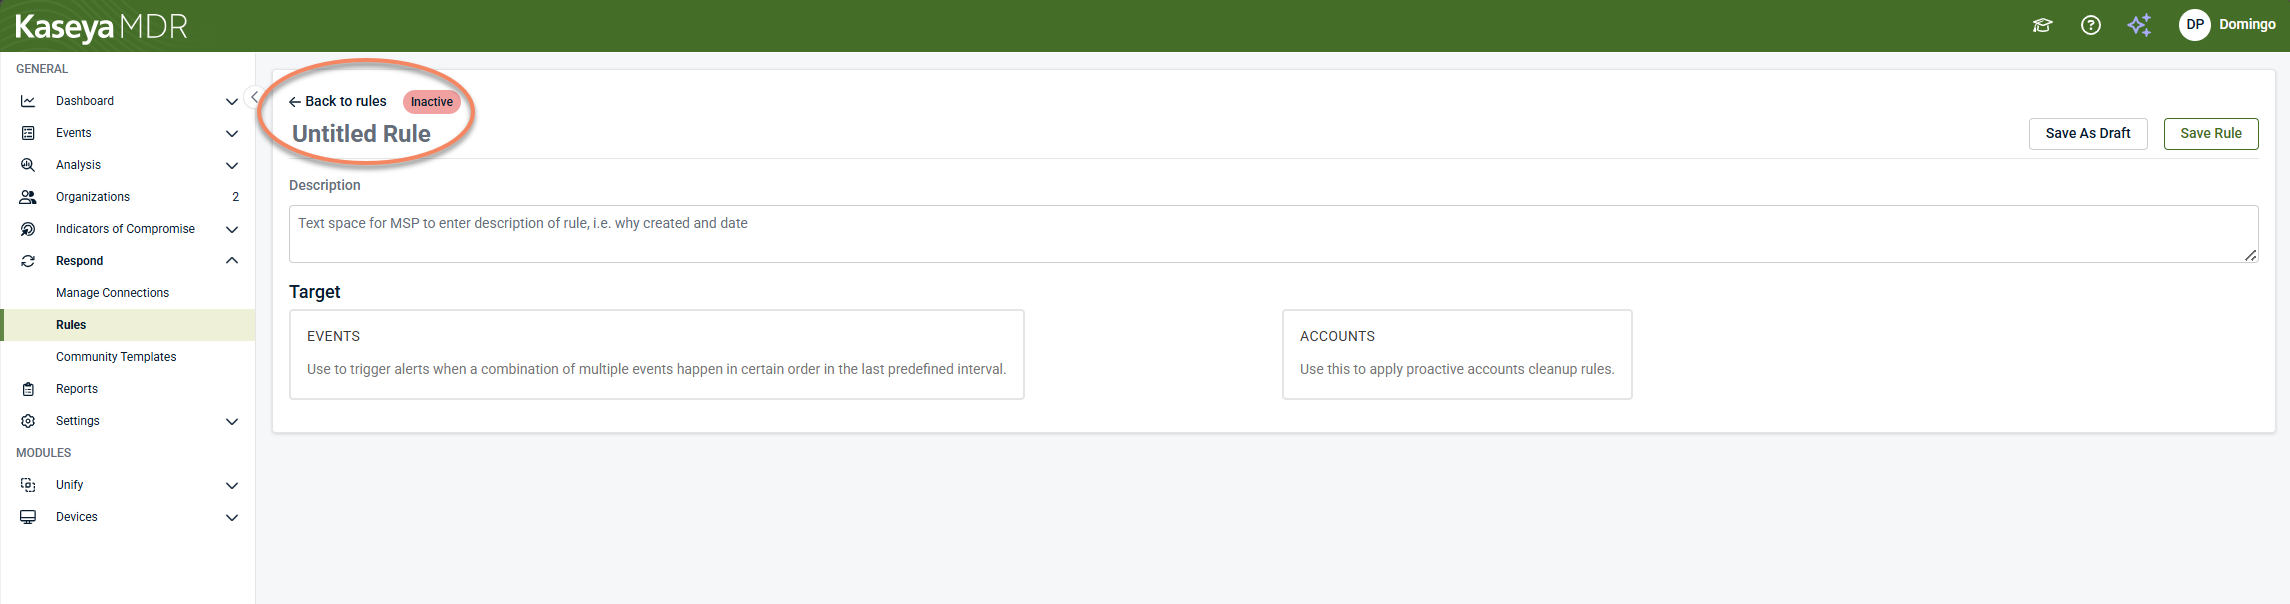
Click Untitled Rule and enter a clear, specific name.
-
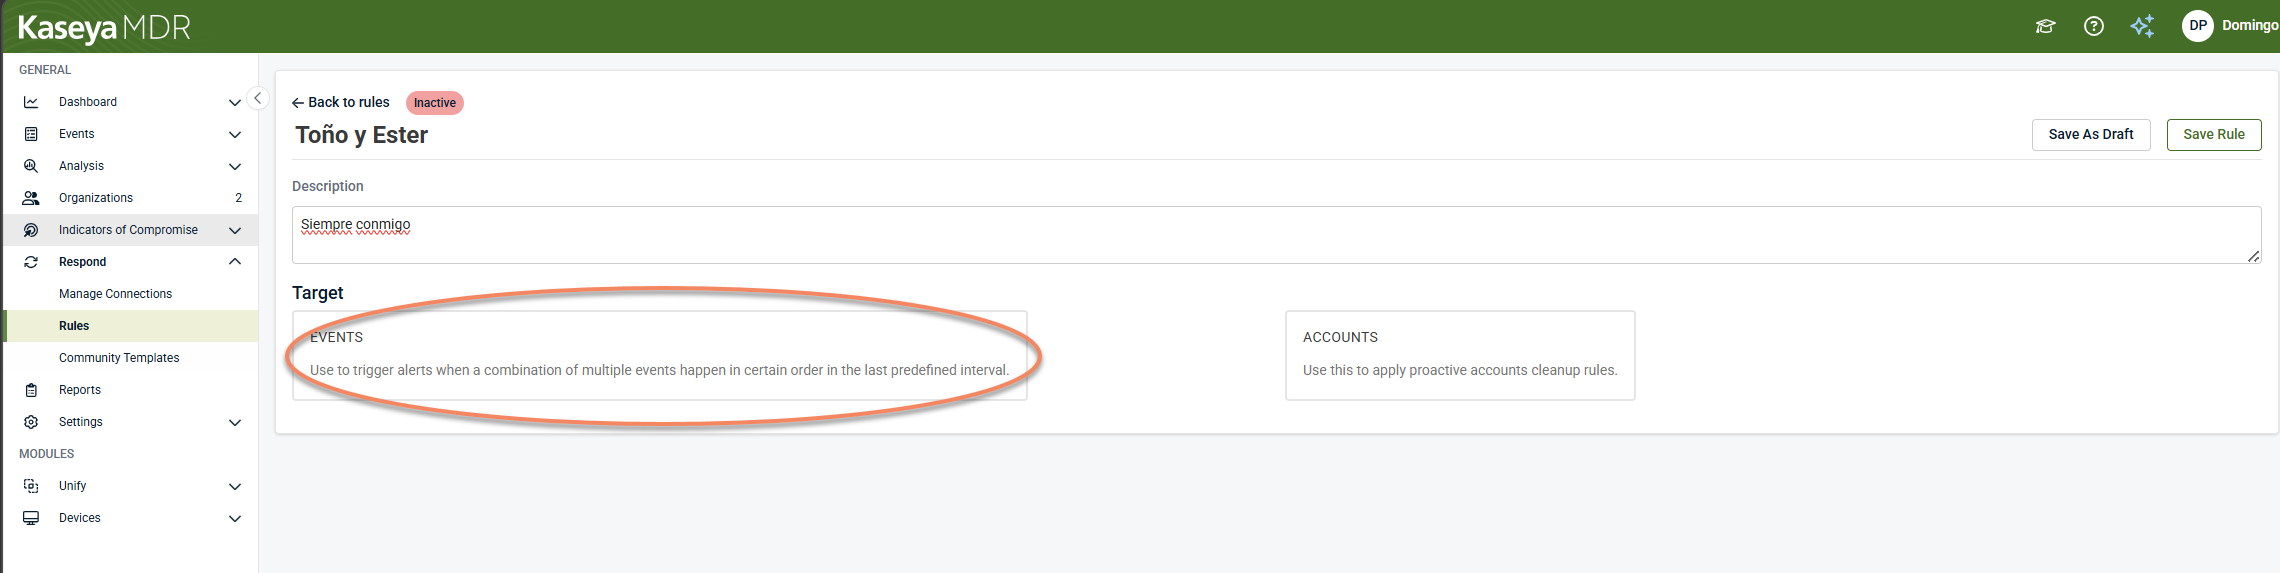
Choose Events as the rule type.
Step 2: Configure the Trigger (what the rule evaluates)
In the Trigger section, you define what data the rule evaluates.
-
Application: Select the application to monitor (for example, Microsoft 365).
-
Organizations and accounts. Select the scope:
-
One organization / one account
-
Multiple organizations / multiple accounts
-
All organizations and/or all accounts
-
IMPORTANT If Trigger rules for all organizations or Trigger rules for all accounts is enabled, the scope automatically includes organizations or accounts added in the future.
Fire rule only if Respond is enabled for the organization
Some environments allow you to choose whether the rule should:
-
Trigger even when Respond is not enabled for the organization (useful for alert‑only rules), or
-
Trigger only for organizations with an active Respond connection (required for response actions)
Step 3: Define Conditions (what must happen)
Click Conditions.
For each condition:
-
Select the event or Alert Description
-
Set the number of occurrences
-
Set the time frame the occurrences must happen within
Notes:
-
The minimum occurrence is 1
-
The minimum time frame is 15 minutes
-
You can add multiple events, each with its own parameters
-
Use AND / OR operators to combine events into more complex logic
Behind the scenes, Respond evaluates rule conditions on a recurring interval and checks for the occurrence criteria defined in the rule.
Step 4: Review the Trigger summary
Click Summary to review the Trigger settings.
If you need to change anything, use the edit controls (for example, the pencil icon or step numbers) to return to earlier screens. When the Trigger section looks correct, continue to the Response section.
Step 5: Configure the Response (what happens when the rule triggers)
Choose the response action
In the Actions tab of the Response section, select what should happen when the trigger criteria are met.
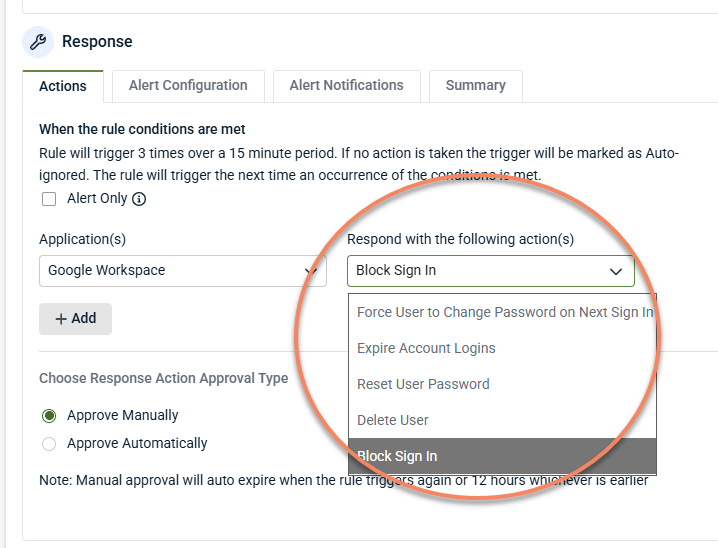
Available actions vary by environment. Examples include:
-
Block sign‑in
-
Expire account logins
-
Reset user password
-
Force password change on next sign‑in
-
Alert‑only
Alert‑only generates an alert but performs no remediation.
Some actions may take time to propagate. When rapid risk reduction is required, consider combining complementary actions (for example, expiring sessions plus blocking sign‑in) to limit impact while investigation continues.
See Respond actions for detailed information.
Choose the action approval type
Select how actions are approved:
-
Automatic: Actions execute immediately when the rule triggers.
-
Manual approval: An administrator must approve each trigger before actions run.
If manual approval is enabled, reminders may be sent if a trigger is not handled within a configured interval.
Alert configuration
Set alert severity
On Alert Configuration, set the severity for the event generated by the rule (for example, Critical, Medium, or Low).
Depending on your environment, only Medium and Critical typically generate notifications such as PSA tickets or email alerts.
Configure Event alert assignment
Some environments provide an Event Alert Assignment option to control how rule‑generated events are assigned in reports.
Alert Notifications
If supported in your environment:
-
Open Alert Notifications
-
Click Add and enter one or more phone numbers
SMS alerts are commonly used for:
-
High‑impact rules
-
After‑hours coverage
-
Manual approval workflows
Schedule the rule
In the Schedule section, choose when the rule is allowed to run:
-
Always On: The rule runs continuously
-
Specific Time and Duration: The rule runs only within a defined window
-
Recurring : The rule runs on a daily, weekly, or monthly schedule
In the Summary tab, click Save Rule or click Save as Draft if you want to finish later.
After a rule is created, monitor how it behaves in practice:
-
Use Analysis to confirm the rule triggers only for the intended pattern
-
Review trigger details to understand which events satisfied conditions
-
Adjust scope, thresholds, or time windows if the rule is too noisy
-
Keep rules in alert‑only or manual approval mode while tuning
Respond rules are most effective when used to correlate multiple signals, such as repeated IOC matches combined with other activity, before escalating or automating response.
If similar alerts continue to appear in other products, remember that Respond rule configuration is shared across products, while alerting behavior remains dependent on each product’s context, data sources, and integrations.
Manual approval: reviewing a triggered rule
If a rule uses Manual Approval, available actions may include:
-
Approve: Runs the configured actions
-
Manually remediated: Records that remediation occurred outside the platform
-
Reject: Skips actions for that trigger
Troubleshooting
-
Rule triggered but remediation failed. Common causes include:
-
The organization is not connected to Respond
-
The Respond connection is broken or permissions changed
-
If available in your UI, use Fix Connections or Connect Organizations from Respond to repair the connection.
-
Rule is too broad. If the rule triggers more often than expected:
-
Narrow the scope to specific organizations or accounts
-
Add filters to exclude known benign values
-
Tighten thresholds or time windows
-
Switch to alert‑only while tuning
-
Important considerations
-
Respond rules are intended to complement investigation, not replace it.
-
Alert‑only behavior is appropriate when testing or when automation is not desired.
-
Response actions may depend on available integrations and configuration.
-
Preserving rules during tuning helps maintain continuity and auditability.
Related articles
-
Creating high‑confidence alerts with Respond rules: Learn how to design rules that surface meaningful patterns rather than isolated activity
-
Analyzing a Respond trigger: Understand how to review why a rule triggered and what outcome occurred
-
Respond actions: Describes common response actions that may be available when a Respond rule triggers and explains how to use them safely, including when alert‑only behavior is appropriate
-
Managing Respond connections: Explains how Respond connections enable response actions for each organization, how connection status affects execution, and how to identify and resolve broken connections


